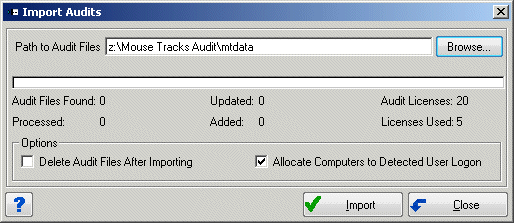
Importing Audit Files
Once you have collected audit files using Mouse Tracks Audit 32, you will need to import them into the database. From the Tools menu, choose Import Audits.
Path to Audit Files - Either Browse to the location of your audit files or type in the path.
Delete Files After Importing - Select this option if you do not wish to retain audit files once they have been imported in to Mouse Tracks. If you are in the process of adding or modifying custom software signatures, you may want to leave this option unchecked.
Allocate Computers to Detected user Logon - Select this option if you want the computer to be assigned to the User ID under which the audit was run. If you have an employee going from workstation to workstation auditing PC's, you probably wouldn't want to select this option. However, if you are running your audit from a network logon script, this could be very useful.
Import - Click this command to import the audits into Mouse Tracks.
Additional Information
The default settings for 'Deleting Audit After Importing' and 'Allocating Computers to Detected User Logon' can be set by an administrator by choosing Tools--Configure Mouse Tracks--Inventory tab.
Since the Mouse Tracks audit files do not have the computer asset tag number stored in them (unless you customized the audit to prompt for this information), the import process will use the computer's name as the key for updating the database. If a computer name matches a computer in the database, the record will be updated. If the computer's name does not match a computer in the database, the record will be added and the computer tag number will be set equal to the computer name. Updating a PC does not require an audit license. Only the addition of a PC requires an audit license. Once a record is in the database, the import process will not update the asset tag (compTag) number. It is good practice to manually rename computer in Mouse Tracks before renaming the computer itself.